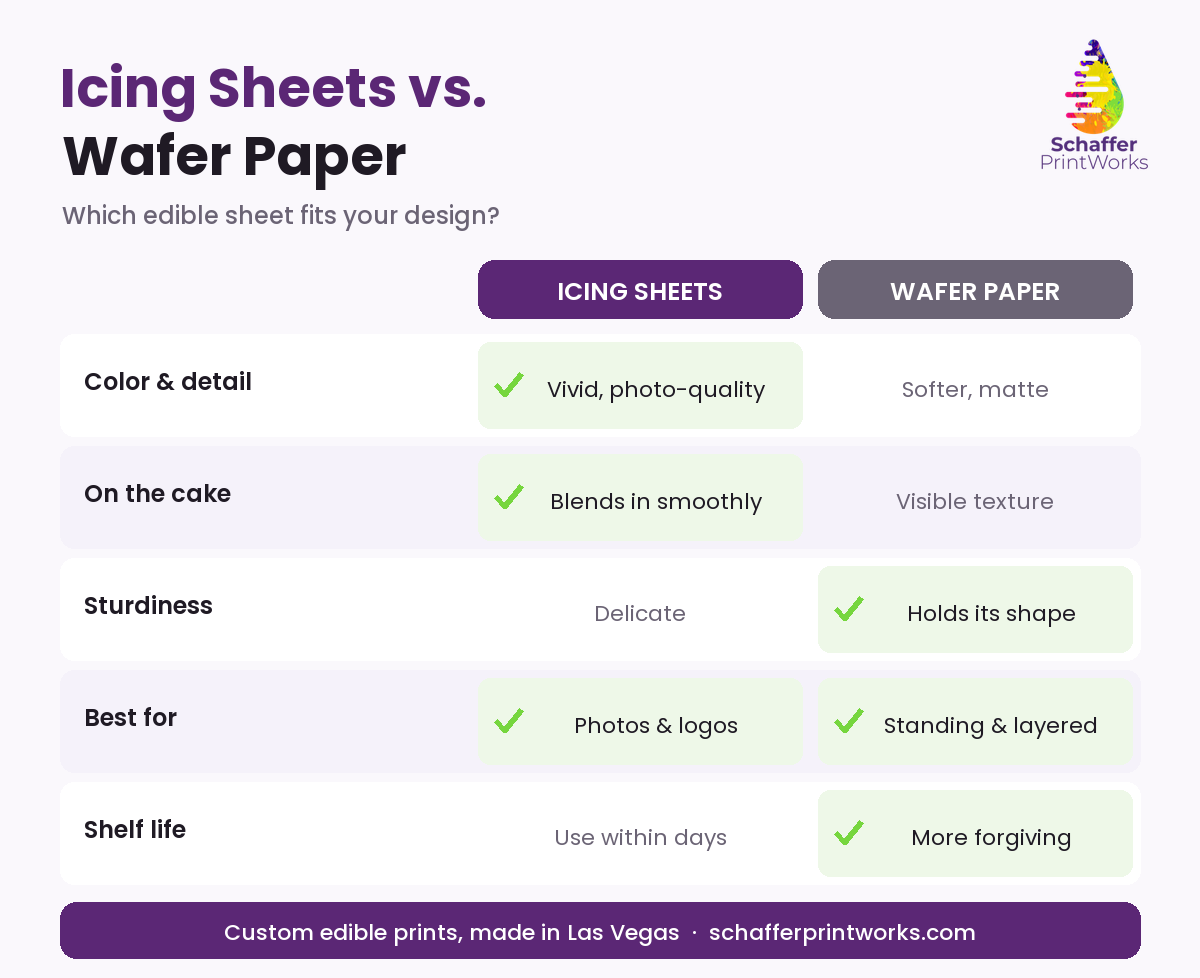
Here’s the short answer: icing sheets (also called frosting sheets) blend smoothly onto buttercream and fondant and give you vivid, photo-quality color — so they’re best for logos, photos, and full-color designs. Wafer paper is more textured and sturdy, which makes it great for layered toppers and standing pieces. If you’re decorating a cake and want the image to look like part of the cake, reach for an icing sheet. If you want something with a little body that holds its shape, reach for wafer paper.
That’s the decision in a nutshell. Now let’s walk through how to actually use each one so your prints come out crisp every time.
Icing Sheets vs. Wafer Paper: What’s the Difference?
Both are edible, both take printed full-color designs, and both come off a backing sheet. The difference is in the feel and the finish.
Icing (Frosting) Sheets
Icing sheets have a thin, flexible, slightly glossy surface that melts into a frosted cake. Color comes out rich and true, which is why they’re the go-to for:
- Business and brand logo cakes
- Photo cakes and memorial cakes
- Anything with fine detail or small text
The trade-off: they’re delicate. They don’t love humidity, and they can dry out or curl if you leave them exposed. Plan to use them soon after they’re printed.
Wafer Paper
Wafer paper is made from potato or rice starch. It’s thicker, a touch grainy, and far more forgiving to handle. Colors look slightly softer than on an icing sheet, but the paper itself holds up — so it’s ideal for:
- Standing cake toppers and layered pieces
- Cupcake and cookie toppers
- Designs that need a bit of structure
If your design needs to stand up or get cut into shapes, wafer paper is usually the smarter pick.
How to Apply an Icing Sheet to a Cake
- Frost first. Apply your image to a freshly frosted buttercream cake or smooth fondant. A slightly tacky surface helps the sheet grab.
- Peel slowly. Gently separate the printed sheet from its plastic backing. Take your time — rushing here is the number one cause of tears.
- Lay, don’t press hard. Set the image down and smooth it out gently from the center toward the edges with clean, dry fingers.
- Let it settle. The moisture in the frosting helps the sheet blend in over a few minutes. Resist the urge to keep touching it.
How to Use Wafer Paper
Wafer paper is more flexible in how you use it:
- On cakes: Brush a thin layer of edible glue, piping gel, or a little water on the back, then position it. Too much liquid will make it translucent or wavy, so go light.
- For toppers: Cut your printed shape, then stand it in the cake on a food-safe pick. Because wafer paper has body, it holds its shape nicely.
- On cookies and cupcakes: Lay it directly onto royal icing or buttercream while the surface is still soft so it adheres.
A Few Tips That Save Headaches
- Store sealed and cool. Keep printed sheets in their sleeve, away from heat and humidity, until you’re ready. Las Vegas dryness is actually kind to edible paper — but a hot car is not.
- Apply close to the event. Edible prints look their best fresh. Plan to apply yours within a few days of getting them.
- Send good artwork. The print is only as sharp as the file. A clear, high-resolution PNG, JPG, or PDF gives you crisp edges and true color.
- Not sure which to use? Tell us about your design and we’ll recommend the right sheet for the finish you want.
Let Us Handle the Printing
Hand-piping a logo or photo can eat up hours. Edible paper lets you take on detailed, full-color orders without all that work — you decorate, we print. We print on quality edible icing sheets and wafer paper using food-safe edible inks, right here in the Las Vegas valley, with local delivery or pickup so you skip the shipping wait.
See everything we can print, including the gallery and FAQs, on our edible paper prints page.
Got a design ready to go? Send us your artwork and event date for a fast quote — we usually reply within one business day.